Git Manager
Start here for the experimental Git Manager in Wappler: learn the layout, daily workflow, history tools, branching, remotes, and recovery paths.
Git Manager Overview
Start with the Git Manager guide that matches your job
The new Git Manager is no longer just a commit helper. It is a repo cockpit with view modes, history inspection, branch and remote operations, and recovery tools. Pick the path that matches what you need right now.
Git Manager: Quick Overview
Get a fast, accurate map of the new Git Manager: view modes, branch and actions & options menus, adaptive sync toolbar, history list, and detail workspace.
Git Manager at a glance
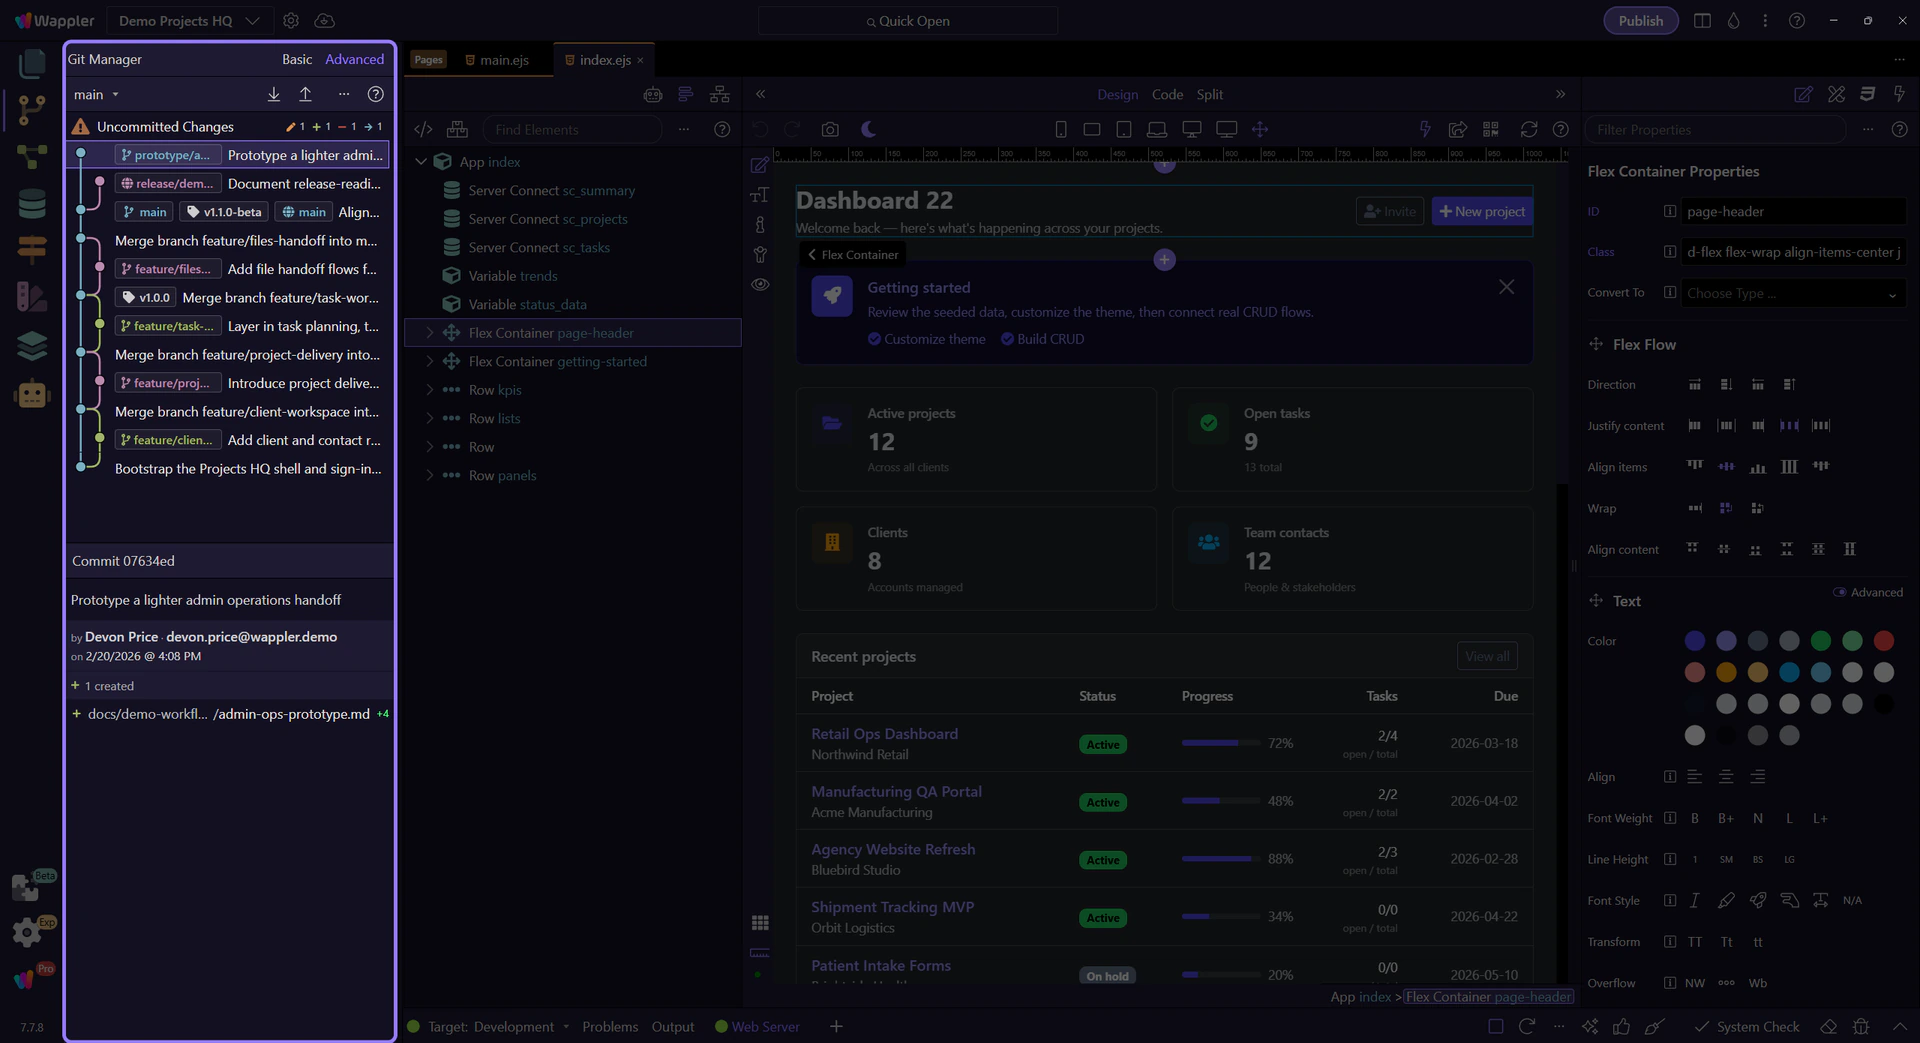
Think of Git Manager as a live repository view inside Wappler, not a single-purpose commit screen. In Demo Projects HQ you are looking at a repo that already has uncommitted changes, local branches, remote-tracking branches, and tags, so the UI can expose real decisions instead of empty-state placeholders.
Start in Basic view for the day-to-day reading
This step switches Git Manager to Basic view first. Basic is still the faster day-to-day reading of the repository, but it is no longer a stripped-down dead end: the actions & options menu can still show the commit graph and tags when you want light structure without committing to full Advanced mode.
Switch to Advanced when branch context matters
Now switch to Advanced view. Advanced reads the same repository with more structure on screen: graph lines, local and remote refs, tags, and stronger history-oriented context. Use it when you need to understand where work came from, how branches relate, or where a safe restore point sits in the broader history.
Advanced view adds history context, not a different repository
With Advanced selected, the history list becomes a richer reading surface. The same commits are still here, but now the graph, refs, and extra commit context help you see feature-branch movement and merge direction instead of only reading a flat sequence of subjects.
The toolbar centers on the branch menu and sync state
The main toolbar now teaches two things at once: which branch you are on, and what sync state that branch is in. The branch button is a menu for switching local branches or creating a new one, while pull and push surface ahead/behind counts when tracking is active. No remote means Connect. An active merge suppresses normal sync and replaces it with Continue Merge and Abort Merge.
The actions & options menu changes with the current view
The actions & options menu is where Git Manager keeps the controls that reshape how you read the repository. In Basic view it adds Refresh, optional Fetch, and a Show submenu with toggle items for the graph and tags. In Advanced view the same menu grows into the history control center with View and Show submenus, checkmarked toggles, and ordering options.
History starts with what needs attention now
The main panel is not just old commits. When the working tree is dirty, Git Manager pins an Uncommitted Changes row above the history so you can move from today’s edits into the commit timeline without switching tools.
Selecting something changes the workspace
Select Uncommitted Changes and the manager becomes a staging-and-commit workspace. Select a commit and the manager turns into an inspection view with message, author, changed files, and diff-oriented actions. The list and the detail workspace are designed to work as one flow.
Choose the next Git task
If the layout makes sense now, continue with the guide that matches the job you actually need to do.
Git Manager Reference
Reference tour for the experimental Git Manager: view modes, branch and actions & options menus, history behavior, context actions, detail workspaces, and special repository states.
Git Manager has three recurring surfaces
Read the manager in three layers: the title area chooses how much history structure you want, the main toolbar exposes repository operations, and the main panel moves between working-tree review and commit history. Once you see those three layers, the rest of the UI becomes predictable.
Switch to Basic view
Use Next here to switch Git Manager to Basic view so the selected Basic button is visible on the following step.
Basic view is the focused everyday reading
Basic view is active here in the history list. The list stays flatter and easier to scan: commit subjects, relative time, and only lightweight tag context unless you explicitly add more structure back from the actions & options menu.
Toolbar controls appear and disappear with repository state
Read the toolbar from left to right until you reach the utility end. Branch opens the switching and creation menu. Connect appears before any remote is configured; once a remote exists it gives way to Pull and Push, which can show behind and ahead counts on the current tracking branch. During merge state those sync buttons step aside for Continue Merge and Abort Merge so you finish or cancel the risky state first.
Open the real branch menu
Use Next here to open the actual branch menu from the toolbar so the live switching surface stays visible on the following step.
The branch menu keeps switching and creation together
This is the real branch menu from the toolbar. It shows the current branch with a check, lists the local branches you can switch to, and keeps Create Branch in the same surface so the normal branch workflow stays visible and direct.
The actions & options menu and Help are part of the manager model
After the branch and sync controls, the right end of the toolbar finishes with the actions & options menu and Help. The ... button is the quick maintenance and reading-controls surface: Refresh stays there, Fetch joins when remotes exist, and its View and Show submenus expose toggle-driven reading options for the history you are looking at. Help is the anchored learning entry point, so even when the repository is messy you still have a direct path back to the Git guides.
Open the Basic actions & options menu
Use Next here to open the real actions & options menu while Basic is still selected. That matters because Basic is not just a static simplified list anymore; this menu is where you can add back graph and tag context without switching to Advanced.
Basic keeps the actions & options menu lightweight
This is the real Basic actions & options menu. Refresh redraws the current repository state, Fetch appears once a remote exists, and Show is the lightweight reading group for Basic mode. Inside that Show submenu, the toggle items for Commit Graph and Tags let you turn those layers on or off without forcing full Advanced mode. The checkmarks tell you which optional reading layers are currently visible.
Switch to Advanced view
Advanced is the richer reading mode when branch shape, refs, and tags matter. This step returns you to the view toggle after the Basic actions & options menu so the next step can switch that richer mode on cleanly.
Advanced view exposes graph, refs, and richer history context
Advanced view is active here in the history list. The same commits now carry graph lines, branch refs, remote refs, and tags so you can read branch position and merge shape instead of only a flat timeline.
Open the Advanced actions & options menu
Use Next here to open the real actions & options menu for Advanced mode while Advanced is still selected. The point is to see the live reading controls while the selected Advanced button is still on screen.
Advanced exposes full history reading controls
This is the real Advanced actions & options menu. Refresh and Fetch still maintain the repository picture, but Advanced adds three reading groups. The View submenu lets you toggle between the full history and just the current branch. The Show submenu gives you toggle items for Commit Graph, Tags, First Parent Only, and Decorated Commits Only, with checkmarks showing the active reading layers. Order lets you read the same graph either By Date or Topologically, depending on whether chronology or branch shape matters more.
The history list mixes now and then on purpose
Read the main list as two adjacent layers. The pinned Uncommitted Changes row answers what is different right now. The commit rows below answer what has already been recorded. In Advanced mode those same commit rows gain graph lines and refs, but the basic interaction stays the same: pick a row, then read the matching detail workspace.
Uncommitted files use a checkbox list, not the same selection model
When you select Uncommitted Changes, the lower file list switches to checkbox selection because the job here is staging. That list is built with the new wui-list control as well, but its interaction is intentionally different from the commit history: history rows change the active snapshot, while status rows decide which current files are included in the next commit.
Selection decides which detail workspace opens
Selection decides which detail workspace opens. Click Uncommitted Changes and the lower workspace becomes commit preparation: current file list, selection controls, discard actions, and the commit box. Click a specific commit row and the same area switches to inspection: commit message, author, totals, and the committed files shown below. The right-hand surface is meant to change with the row you selected.
The uncommitted preview has its own tools and commit box
The uncommitted preview is operational, not historical. Its toolbar is about shaping the next commit with Select All, Select None, and Discard All, and the commit message box is where that reviewed selection becomes a named snapshot. Those controls disappear when you switch to a past commit because history inspection should not look like staging.
Open the real commit context menu
Use Next here to select a real commit row and open its context menu so the branch, tag, and recovery actions are visible on the following step.
Commit context menus now gather the branch and recovery actions
This is the real commit context menu on the selected history row. This is where you create a branch or tag at this snapshot, checkout, reset, or revert the commit, and manage attached refs from the same place you were inspecting.
Selected commits expose a summary strip and a read-only file list
With a real commit selected, the lower workspace changes from staging to inspection. The summary strip gives quick totals for that snapshot, and the committed file list underneath is a read-only wui-list used for diff-oriented inspection instead of checkbox staging. In Advanced mode, file rows also show insertion and deletion counts so the size of the change is visible at a glance.
Special states change the UI instead of hiding the problem
If a project is not yet a repository, Git Manager shows a Create Repository path instead of an empty list. If a merge is active, the manager disables branch switching and sync until the repository is safe again. The UI deliberately exposes those states so you know which class of action is safe.
Continue with a focused Git task
Now that you have the full map, the next useful change is to stop thinking about the whole manager at once and switch to the single workflow you actually need. Pick the focused tour that matches the Git task you want to perform next.
Git Manager
Start here for the experimental Git Manager in Wappler: learn the layout, daily workflow, history tools, branching, remotes, and recovery paths.
Git Manager
Git Manager now covers the whole repository loop inside Wappler: review working-tree changes, inspect history, switch branches, sync remotes, and recover safely when something goes wrong. Demo Projects HQ is intentionally prepared with uncommitted changes, tags, local branches, and a remote so these guides can show a real repository instead of an empty example.
Git Manager: History and Details
Understand how Git Manager represents uncommitted changes, commit history, refs, detail workspaces, and the new menu-driven history controls in Basic and Advanced view.
History is split between now and already committed
The experimental Git Manager deliberately keeps the working tree and commit history in one timeline. That means your current edits, your recent commit story, your branch refs, and your tags can be reasoned about in one place instead of making you jump between separate Git views.
Switch to Basic view
Use Next here to switch Git Manager to Basic view so the selected Basic button is visible on the following step.
Basic view keeps history inspection lean
Basic view is active here in the history list. It keeps the reading flatter and easier to scan: commit subjects, relative time, and a lighter visual treatment until you deliberately ask for more branch structure from the actions & options menu.
Basic mode still has reading controls in the actions & options menu
Use Next here to open the real actions & options menu while Basic is still selected. Open it when you want just a little more context without leaving Basic. This is where Refresh lives, where Fetch appears when remotes exist, and where the Show submenu lets you turn the graph and tags on or off while keeping the simpler Basic layout.
Basic keeps only the extra structure you ask for
This is the real Basic actions & options menu. Refresh redraws the repository view, Fetch appears when a remote exists, and Show is the small reading-control group for Basic mode. Inside that Show submenu, the toggle items for Commit Graph and Tags let you add or remove just the structure you need while staying in Basic.
Uncommitted Changes anchors the current working tree
The pinned Uncommitted Changes row at the top of the list switches the detail workspace from recorded history to the current working tree. In Demo Projects HQ, that workspace lists the files that are modified, deleted, renamed, or still untracked right now. This is the row that answers the practical question: what would go into the next commit?
The current file list uses checkbox selection for staging
The file list underneath is a wui-list running in checkbox selection mode. Each row is a current file, not an old snapshot. Checkboxes let you decide exactly which files should be staged for the next commit, while the status icons tell you why the file is here: added, modified, renamed, deleted, or conflicted.
The preview toolbar controls batch review before you commit
When Uncommitted Changes is selected, the preview area exposes batch tools for the working tree. Select All and Select None change the staged selection quickly, while Discard All is the destructive escape hatch for throwing away the current working tree. This toolbar only belongs to the uncommitted workspace, because a past commit is something to inspect, not stage.
The commit box turns the reviewed selection into a snapshot
The commit message box belongs to the same uncommitted workspace. After you trim the staged selection to the files you want, describe the change here and create the next snapshot. The important habit is order: review the files, refine the selection, then write the message that matches exactly what is being committed.
Switch to Advanced view
Use Next here to switch Git Manager to Advanced view so the selected Advanced button is visible on the following step.
Advanced view adds graph context before deep inspection
Advanced view is active here in the history list. The same commits now carry graph lines, refs, and tags so you can inspect branch movement and merge placement with the context already visible.
Advanced history shows refs and commit shape at the same time
With Advanced selected, the history list becomes more than a sequence of commit messages. Branch refs, tags, and graph structure sit alongside the commits so the next inspection steps happen with branch context already visible on screen.
Advanced menu controls decide how much history you see
Use Next here to open the real actions & options menu for Advanced view while the selected Advanced button is still on screen. In Advanced mode, this menu can switch between all history and the current branch, expose toggle-driven View and Show submenus, trim the graph, and reorder commits.
Advanced history controls answer different reading questions
This is the real Advanced actions & options menu. The View submenu changes the history scope between the whole repository story and just the current branch. The Show submenu controls toggle items such as Commit Graph, Tags, First Parent Only, and Decorated Commits Only, with checkmarks showing the active reading layers. Order changes how the same commit set is arranged, so you can prefer a chronological read or a cleaner graph-oriented read before you inspect individual commits.
A commit row opens the recorded snapshot details
A real commit row below Uncommitted Changes switches the detail workspace from commit preparation to commit inspection. The preview shows the recorded message, author, date, and totals for that snapshot, so the question changes here from what will I commit next to what exactly was committed at this point in history?
The summary strip explains the shape of the selected commit
At the top of the commit preview, Git Manager summarizes what kind of change set this commit contains. Those totals tell you whether the snapshot mostly created files, modified existing work, removed code, or renamed paths. It is the quickest way to judge the scope of a commit before opening the file rows one by one.
Committed files are shown in a read-only inspection list
The committed file list is another wui-list, but this one is for inspection instead of staging. Each row represents a file captured by the selected commit. In Advanced mode, the rows also expose insertion and deletion counts, so you can distinguish a tiny focused edit from a larger refactor before you even open a diff.
Context actions turn history into a working tool
Use Next here to select a real commit row and open the real history action menu so the branch, tag, recovery, and commit operations are visible on the following step.
The commit menu is the practical history toolbox
This is the real commit context menu on the selected history row. The direct history actions are Create Branch, Create Tag, Revert this commit, Checkout this commit, and Reset to this commit. If the selected snapshot already carries branch or tag refs, those ref labels appear here as submenu entries so ref-specific actions stay attached to the exact commit that exposed them.
Attached branch and tag labels open a second layer
When the selected commit already carries a branch or tag ref, the ref label itself becomes a submenu entry in the context menu. That keeps branch-specific or tag-specific actions attached to the ref you were already looking at instead of mixing them into one flat list.
Ref submenus explain what you can do to that exact branch or tag
A branch-ref submenu can offer checkout, merge into main, merge main into that branch, rename, delete, and copy branch name. A tag-ref submenu stays narrower: checkout, rename, delete, and copy tag name. The important pattern is that Git Manager keeps those ref actions attached to the exact label you opened, not hidden behind a generic branch dialog.
Changed files have their own history actions
The two detail lists support different kinds of decisions inside the lower workspace. In the Uncommitted Changes workspace, file rows help you inspect, discard, or resolve one current file at a time. In commit inspection, file rows help you diff, compare with HEAD, or check out one file from that past snapshot. The manager keeps those actions file-sized so review and recovery do not always require a branch-sized operation.
The pinned Uncommitted row has its own smaller context menu
Right-clicking the pinned Uncommitted Changes row does not show branch or commit recovery actions, because this row represents the current working tree rather than a recorded snapshot. Its context menu is intentionally small and destructive: Discard All Changes is the repository-wide throw-away action for the current working tree, not a history rewrite command.
Continue with the next Git decision
Once the history model is clear, continue with the area that normally depends on it: recovery, branches, or remotes.
Git Manager: Working Styles
Use Git Manager in simple solo backup mode or team feature-branch mode, and understand the lightweight Git flow behind each approach.
Git can be a restore map or a team timeline
Keep the first mental model simple. Git records checkpoints and relationships between them. If you work alone, those checkpoints behave like restore points and off-machine backup when you push to a remote. If you work in a team, the same history also shows who changed what, on which branch, and what still needs to be merged.
Solo work can stay very simple
A solo workflow does not need a heavy branching strategy. Select the Uncommitted Changes row, shape a small checkpoint, commit locally, and push to a remote when you want off-machine backup. That gives you a clean chain of restore points without turning every edit into process overhead.
Commits and tags become your restore points
When you need to go back, click an earlier commit and inspect the files it changed. Use file checkout when you want one file back, revert when you want a safe undo commit, checkout when you want to inspect an older state, and tags when you want named checkpoints such as demo-ready or before-refactor. History becomes a practical backup catalog, not just a log.
Advanced view explains branch relationships, not just more details
Use Basic view when you only need today’s checkpoint flow. Switch to Advanced view when you need the background behind the repository: graph lines, branch refs, remote refs, tags, and the commit context needed to understand where a feature branch diverged and what is safe to merge. It is the same repository, just a more explanatory reading of it.
Team work usually stays simple with feature branches
A practical team flow is: start from main, create one branch per feature or fix, commit related work on that branch, push it to the shared remote, and merge it back only when the feature is ready. That keeps unfinished work away from the main line while still letting every teammate publish progress and recover their work from the same remote repository.
The shared remote is both collaboration point and backup
When several people use the same remote, it serves two jobs at once. It is the shared source of truth for branch history, and it is also the place where each person’s local commits stop being tied to one machine. Pull to catch up with the current shared state, then push your branch so the team can review, merge, or continue from the same repository.
Merge when the feature is coherent, not half-built
When a branch tells one coherent story, switch to the target branch, inspect the feature branch in Advanced view, and merge it. If conflicts appear, resolve them file by file and then continue the merge. This keeps the main branch stable while still giving every feature a visible path from first commit to finished merge.
Choose the flow that matches your project
Use the solo checkpoint flow when Git is mainly your safety net and remote backup. Use the feature-branch flow when several people share one remote or when you need unfinished work to stay isolated until it is ready. The manager supports both styles; the difference is how much branch structure you need to make the history readable and safe.
Git Manager: Branches and Merges
Work with local branches, the new branch menu, merged commit/ref context actions, and merge-resolution flow in the experimental Git Manager.
Demo Projects HQ is prepared to show real branch states
This repository includes local feature branches, a prototype branch, and a remote-only branch so the experimental manager can show the branch cases teams actually hit: switching locally, creating tracking branches, merging work back, and understanding which refs are only on the remote.
The branch button is now the normal switching menu
Use Next here to open the real branch menu so the live switching surface stays visible on the following step.
The branch menu makes switching explicit
This is the real branch menu from the toolbar. Plain branch names appear as direct items, while prefixed names such as feature or prototype collapse into grouped submenus so the root menu stays readable. The current branch keeps its checkmark, alternate branches stay one click away, and Create Branch remains at the bottom because switching existing work and starting new work are different decisions.
Prefixed branch families open nested submenus
When several branches share a prefix, Git Manager groups them into a family entry such as feature or prototype instead of leaving one long flat list. Hover the family entry to reveal the actual branch names inside that branch type.
The submenu holds the concrete branches you can switch to
The submenu contains the concrete branch names you can switch to. In Demo Projects HQ that means the feature branches live inside the feature group, while other prefixed work such as prototype/admin-ops can live in a different family. Choose the exact branch here; Create Branch stays on the root menu because starting new work is different from switching to existing work.
A simple feature branch flow keeps unfinished work isolated
A lightweight team flow is to create one branch per feature or fix, commit only that work on the branch, and push it to the shared remote as progress builds. That lets teammates keep main stable while still reviewing or helping with the feature branch before it is merged.
History can be the branching point
History is also a branching surface now. You can create a branch from the branch menu when you want to start from the current point, or create a branch at a specific commit from the commit context menu when you need to rescue or extend an earlier snapshot. That is much safer than branching blindly from HEAD when the real starting point lives deeper in history.
Switch to Advanced view
Use Next here to switch Git Manager to Advanced view so the selected Advanced button is visible on the following step.
Advanced view shows where branches diverge and rejoin
Advanced view is active here in the history list. The graph lines and refs show where a feature branch split from the main line, which commits belong to it, and which refs are local versus remote-tracking.
Advanced actions & options help isolate the merge story
Use Next here to open the real actions & options menu for Advanced view while the selected Advanced button is still on screen. Use its View and Show submenus to narrow the history, toggle graph layers, and change ordering until the merge path you care about is obvious.
Advanced menu options help isolate the merge path
This is the real Advanced actions & options menu. Use the View submenu to narrow the history scope, use the Show submenu toggles to hide or reveal graph context, and then change ordering until the merge path is obvious enough to act on confidently.
Select a real commit row before opening its context menu
This step reselects a real commit row after the Advanced actions & options menu closes, so the following context-menu step starts from the exact snapshot you want to inspect for branch and tag actions.
Branch ref actions stay attached to the commit that exposes them
This is the real commit menu on the selected history row. Top-level Create Branch and Create Tag start new refs at this exact snapshot, while Revert this commit, Checkout this commit, and Reset to this commit are the direct history-changing or recovery actions. If the commit already carries branch or tag refs, those ref names open submenus so branch-specific merge, rename, delete, and copy actions stay attached to the commit that revealed them.
Merge state takes over the toolbar
When a merge is in progress, Git Manager makes that state explicit. Continue Merge and Abort Merge become the important controls, while branch switching and sync are disabled so you do not layer risky operations on top of an unresolved repository.
Conflicts are resolved from file state upward
Conflicts are resolved from file state upward. The merge workflow can show an explicit conflict dialog with Abort Merge plus resolve-all shortcuts using mine or theirs, and conflicted files also expose their own resolve using mine and resolve using theirs actions. Continue Merge only enables when the conflict state is clear, so the ladder stays visible: resolve files, then complete or abort the merge, then return to normal branch and remote work.
Continue with the next collaboration topic
Branching is only half the story. Continue with remotes if you want to understand collaboration, or recovery if you want the safest repair paths after a bad merge or wrong branch decision.
Git Manager: Remotes and Sync
Connect remotes, read ahead/behind sync cues, use fetch and refresh from the actions & options menu, and handle pull/push safely in the experimental Git Manager.
The toolbar tells you whether the repository is connected
Git Manager uses the toolbar to make remote state visible. Before any remote is configured, Connect to Remote Repository is the important button. Once a remote exists, Pull and Push replace it as sync-status controls and can show behind or ahead counts when tracking is active. The branch button still stays on the left because sync is always about the current branch, and during merge state Continue Merge and Abort Merge take over so you finish the risky state before doing more remote work.
Connect first, authenticate when needed
Connect to Remote Repository is the first remote-state button you see. Use it to register the remote URL and let Git Manager create the default origin entry. Authentication is delayed until the first real network operation, so setup stays quick while still supporting GitHub, GitLab, Bitbucket, generic HTTPS remotes, and SSH remotes.
Refresh and Fetch live in the actions & options menu
The actions & options menu is the lightweight remote maintenance surface in the current manager. Refresh is always there, and manual Fetch appears when remotes exist so you can update remote-tracking refs on demand instead of waiting for the background fetch cycle. Treat that menu as the place to refresh your picture of the remote before deciding whether to pull or push.
Pull first to catch up, push when your local branch is ready
Pull and Push are not symmetric decoration. Pull is the catch-up button: it brings the latest remote commits into your local branch and can start a merge, so Git Manager checks whether the working tree is safe before it begins. Push is the publish button: it sends the commits you already made locally once the branch is truly ahead and the working tree is in a shareable state. The ahead and behind counts explain why one of those buttons matters right now.
Sync changes the history view you are reading
After a successful sync, read the result in the history list and refs instead of relying on a toast alone. After pull, you should see incoming commits appear and remote-tracking refs move. After push, the local and remote refs line up again. Advanced mode makes that easiest to verify because it shows how the remote branch moved relative to your local branch.
A pull may turn into a merge workflow
If pull brings in overlapping work, the toolbar changes meaning immediately. Continue Merge becomes the forward path once conflicts are resolved, while Abort Merge is the escape hatch if you need to abandon the merge attempt. Normal branch switching and sync actions are suppressed in that state so you do not stack more risky operations on top of an unresolved repository.
Continue with the related Git topic
Remote work is easiest to reason about once you also understand the branch model and the history model behind it.
Git Manager: Recovery and Undo
Guide to recovering uncommitted work, commit history, tags, and conflicts safely in Git Manager.
Recovery starts with choosing the least destructive tool
Think of recovery as choosing the smallest reliable restore operation. In Git Manager, history, tags, and file-level actions give you several ways to go back to a previous point without panicking: restore one file, undo a commit safely, inspect an older checkpoint, or return to a named tag before a demo or release. The right tool depends on how much of the past state you actually need back.
Fix uncommitted files before you rewrite history
For current working-tree changes, start with file-level actions: show changes, discard a file, discard all, or resolve conflicted files using mine or theirs. Those tools keep the repair as small as possible and avoid turning a simple file mistake into a branch-wide history operation.
Revert is the safest shared-history repair
Revert this commit creates a new commit that undoes an earlier one. That is usually the safest path once the original commit may already be shared with teammates or remotes, because it preserves the audit trail instead of moving pointers behind everyone’s back.
Checkout and reset are stronger time-travel tools
Advanced mode adds Checkout this commit and Reset to this commit. Checkout lets you inspect an older state directly. Reset actually moves the branch pointer and can keep or discard local changes, so it is more powerful and more dangerous than revert.
You can recover one file without rolling back the whole branch
Within commit details, file-level actions let you diff a file, compare against HEAD, or check out only that file from a chosen commit. That is often the cleanest recovery path when one asset or one script needs to be restored but the rest of the branch should stay where it is.
Tags are a lightweight safety net
Create tags at meaningful commits before releases, demos, migrations, or risky refactors. Those tags act like named restore points, so you do not have to remember a commit hash or scroll history later when you need to get back to the exact state that was known-good.
Continue with the related Git guide
Recovery is easiest to use well when you also understand the history model and the branch model behind the repository state.