Getting Details of the Logged In User and Binding them to your page
Personalise your clients browsing experience by knowing who they are. You can get the logged in user details by filtering the user table in your database, by the logged user ID. This gives you access
Personalise your clients browsing experience by knowing who they are.
Section titled “Personalise your clients browsing experience by knowing who they are.”You can get the logged in user details by filtering the user table in your database, by the logged user ID. This gives you access to all the details of your logged in user, allowing you to personalise the visitor experience by greeting them by name, or any captured data you might have about them.
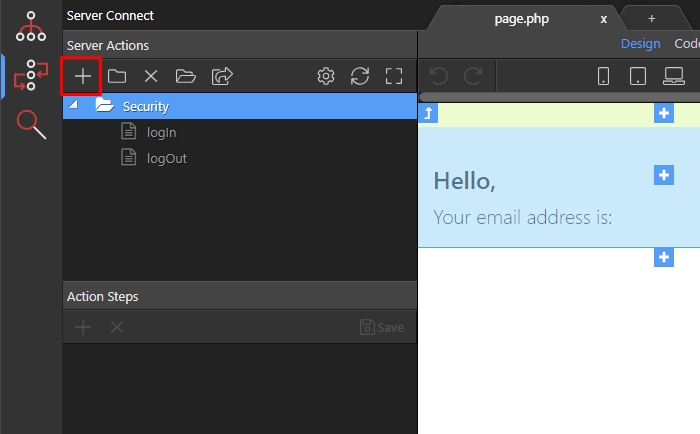
Step 1: First you need to create a new server action:
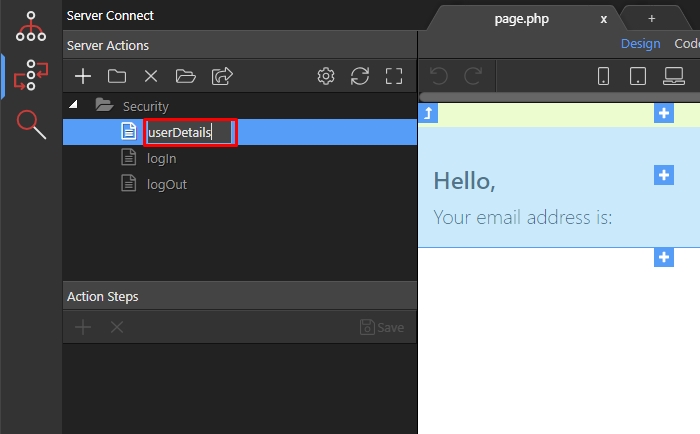
Step 2: We call it userDetails:
Section titled “Step 2: We call it userDetails:”
Step 2: We call it userDetails:
Step 3: Right click steps:
Section titled “Step 3: Right click steps:”
Step 3: Right click steps:

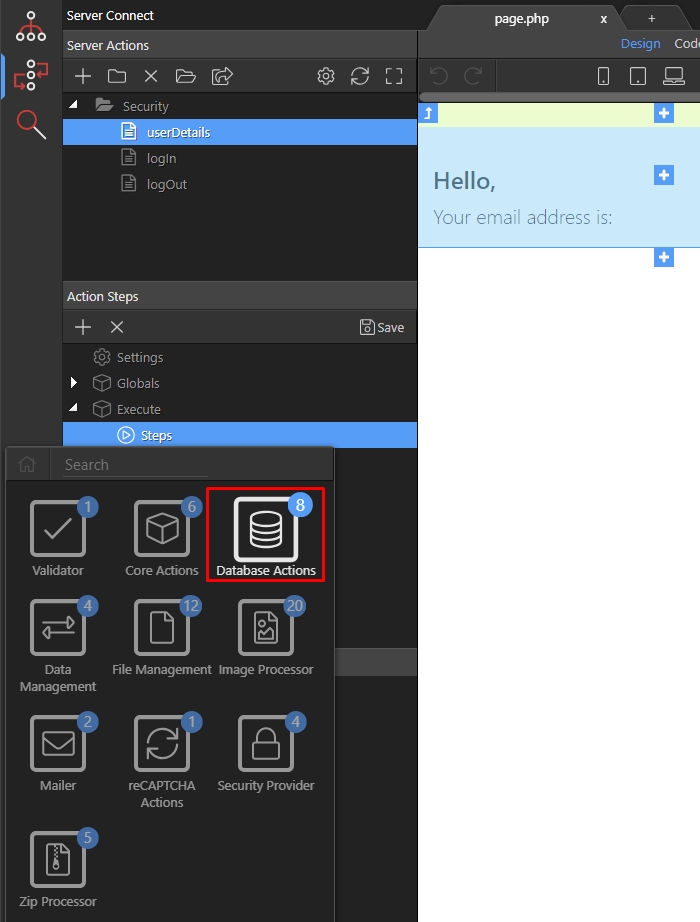
Step 4: Select Database Actions:
Section titled “Step 4: Select Database Actions:”
Step 4: Select Database Actions:
Step 5: And add a Database Connection:
Section titled “Step 5: And add a Database Connection:”
Step 5: And add a Database Connection:
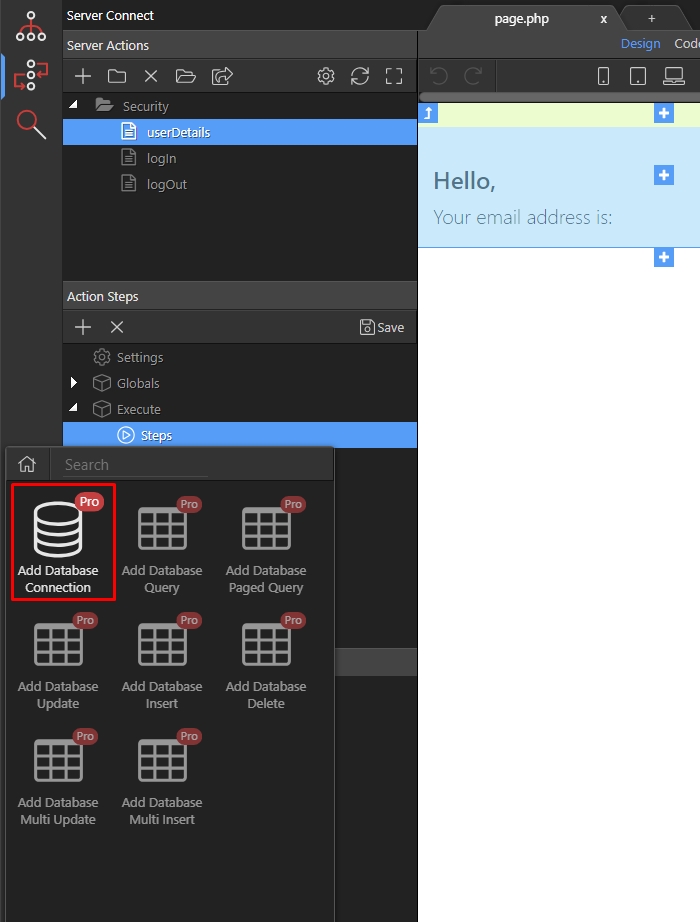
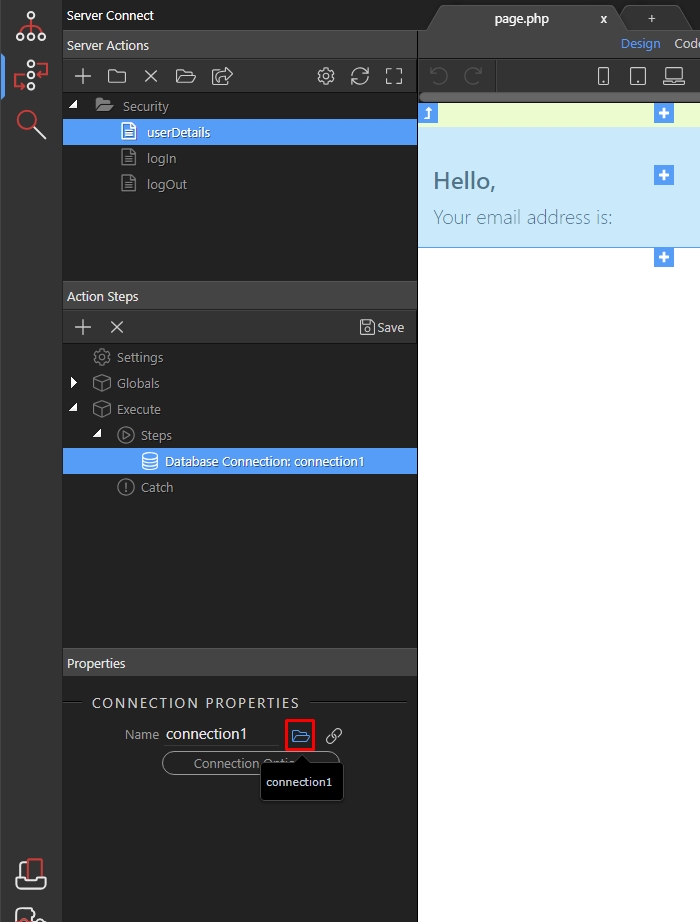
Step 6: Load your database connection:
Section titled “Step 6: Load your database connection:”
Step 6: Load your database connection:
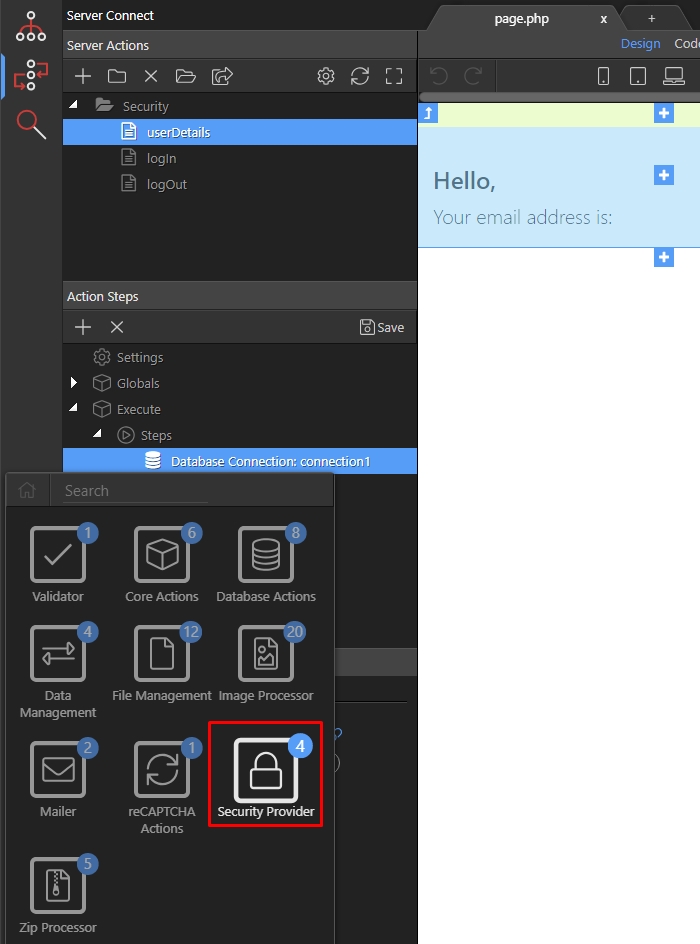
Step 7: Then right click database connection step and open Security Provider:
Section titled “Step 7: Then right click database connection step and open Security Provider:”
Step 7: Then right click database connection step and open Security Provider:
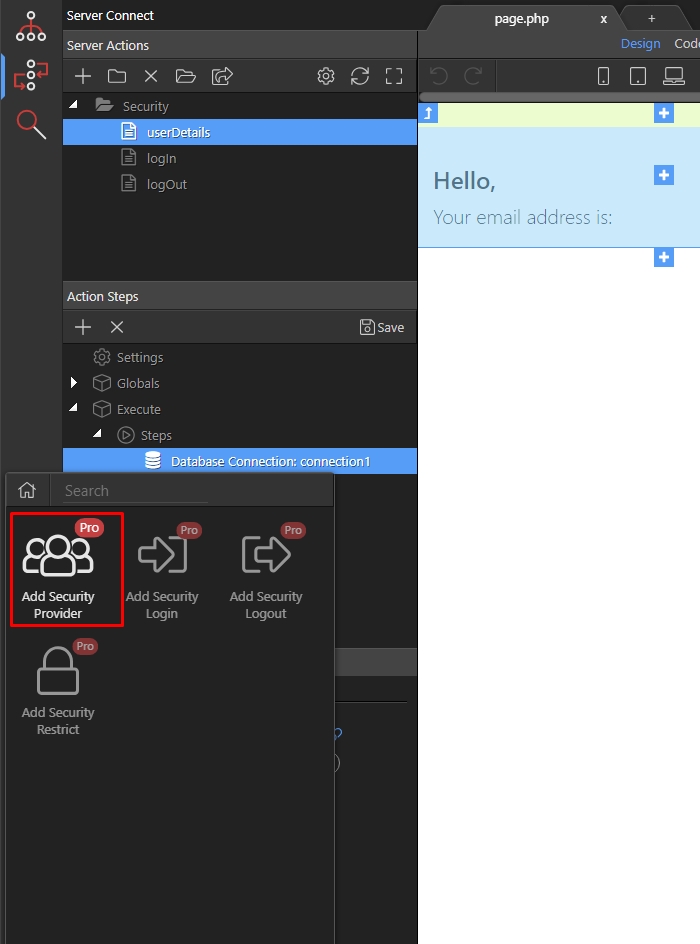
Step 8: Add security provider:
Section titled “Step 8: Add security provider:”
Step 8: Add security provider:
Step 9: And load the security provider instance, which you are using for your site:
Section titled “Step 9: And load the security provider instance, which you are using for your site:”
Step 9: And load the security provider instance, which you are using for your site:
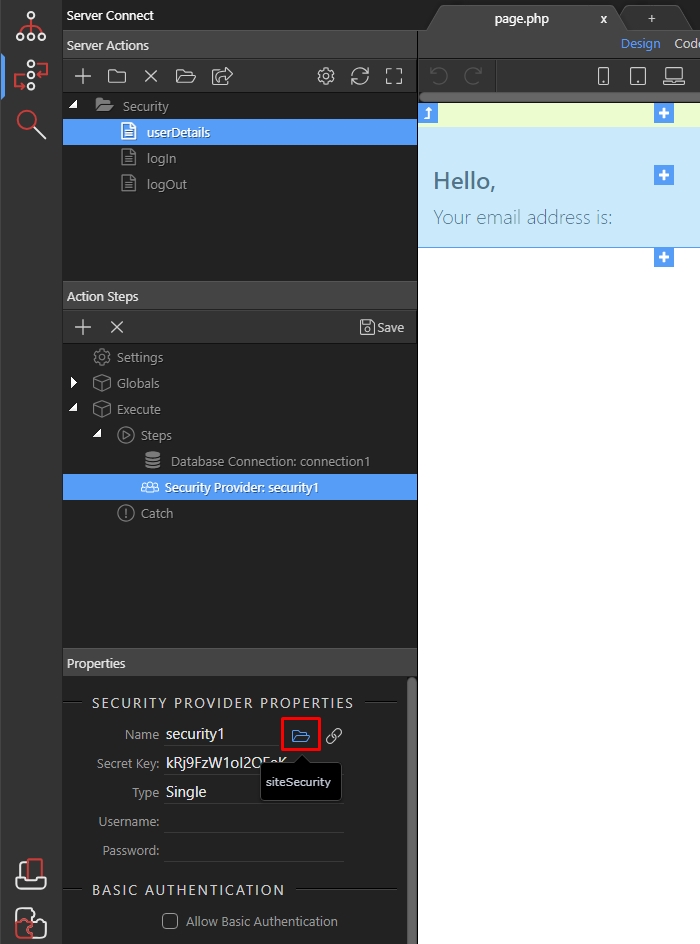
Step 10: Right click the security provider step and open security provider:
Section titled “Step 10: Right click the security provider step and open security provider:”
Step 10: Right click the security provider step and open security provider:
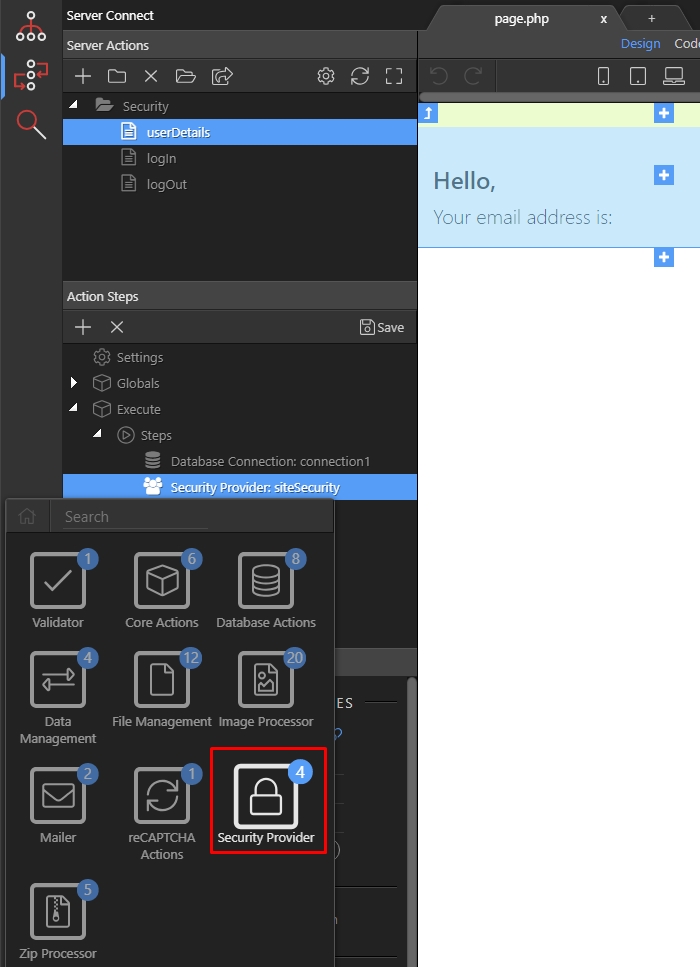
Step 11: Then add security restrict. This is to protect our data from unauthorized access:
Section titled “Step 11: Then add security restrict. This is to protect our data from unauthorized access:”
Step 11: Then add security restrict. This is to protect our data from unauthorized access:
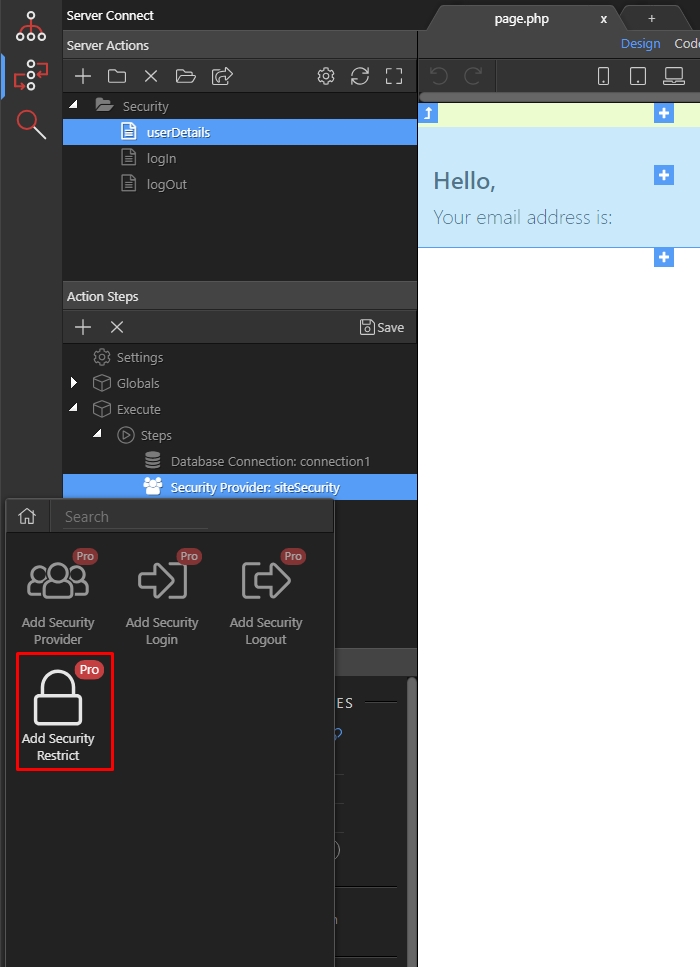
Step 12: After the protection is set up, we add a database query. Right click the security restrict step:
Section titled “Step 12: After the protection is set up, we add a database query. Right click the security restrict step:”
Step 12: After the protection is set up, we add a database query. Right click the security restrict step:
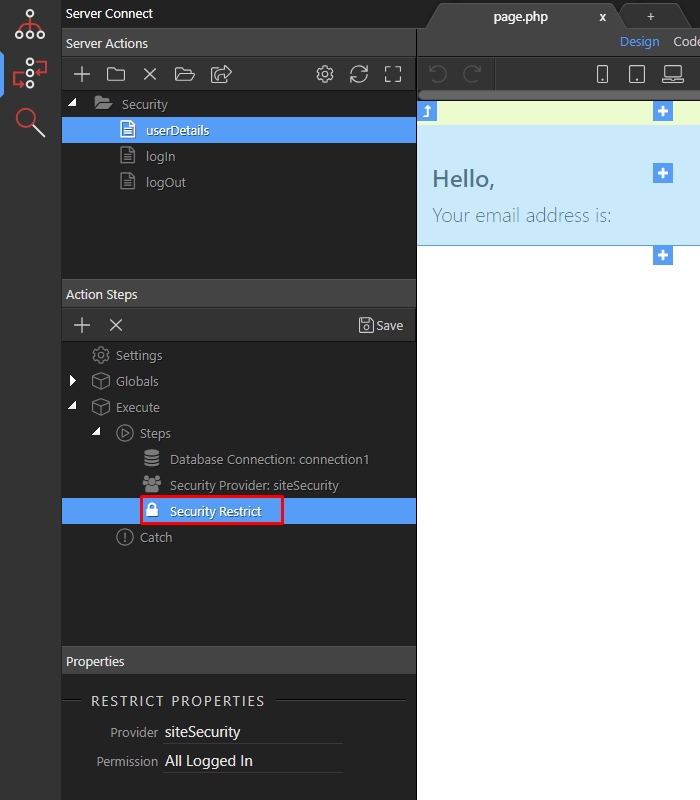
Step 13: Open Database Actions:
Section titled “Step 13: Open Database Actions:”
Step 13: Open Database Actions:

Step 14: And add database query:
Section titled “Step 14: And add database query:”
Step 14: And add database query:
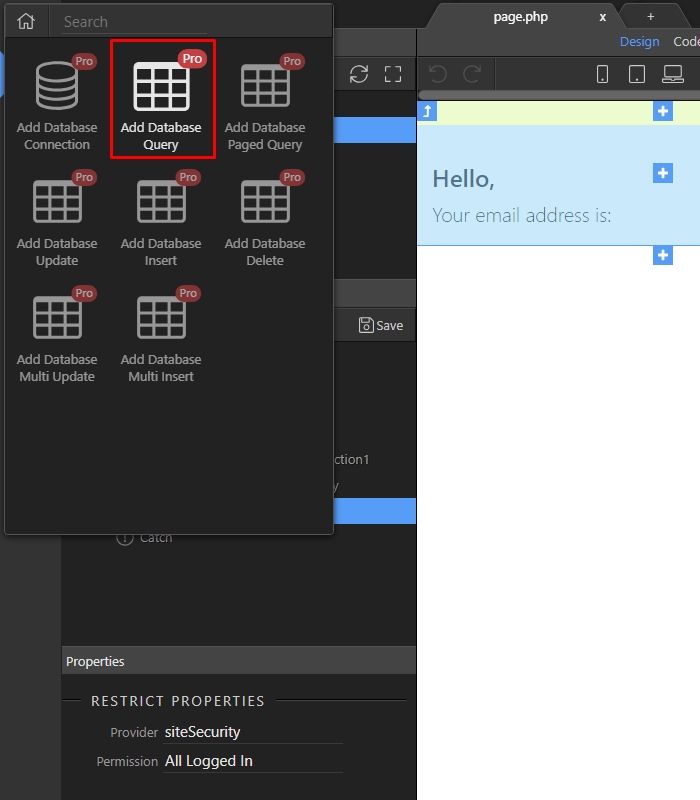
Step 15: Then click the query builder button:
Section titled “Step 15: Then click the query builder button:”
Step 15: Then click the query builder button:
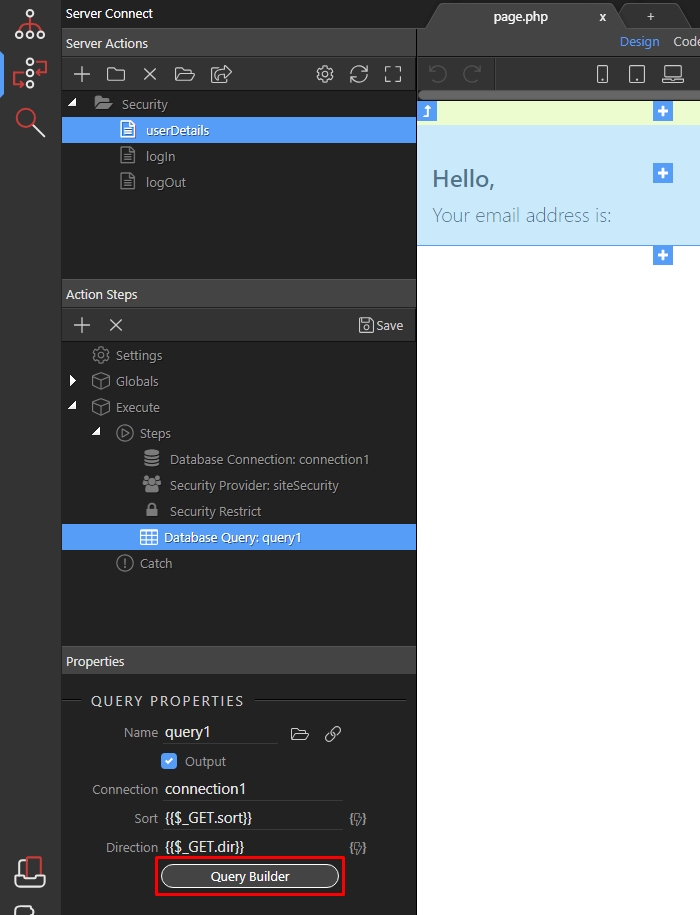
Step 16: And add the table which stores your user(s) details:
Section titled “Step 16: And add the table which stores your user(s) details:”
Step 16: And add the table which stores your user(s) details:
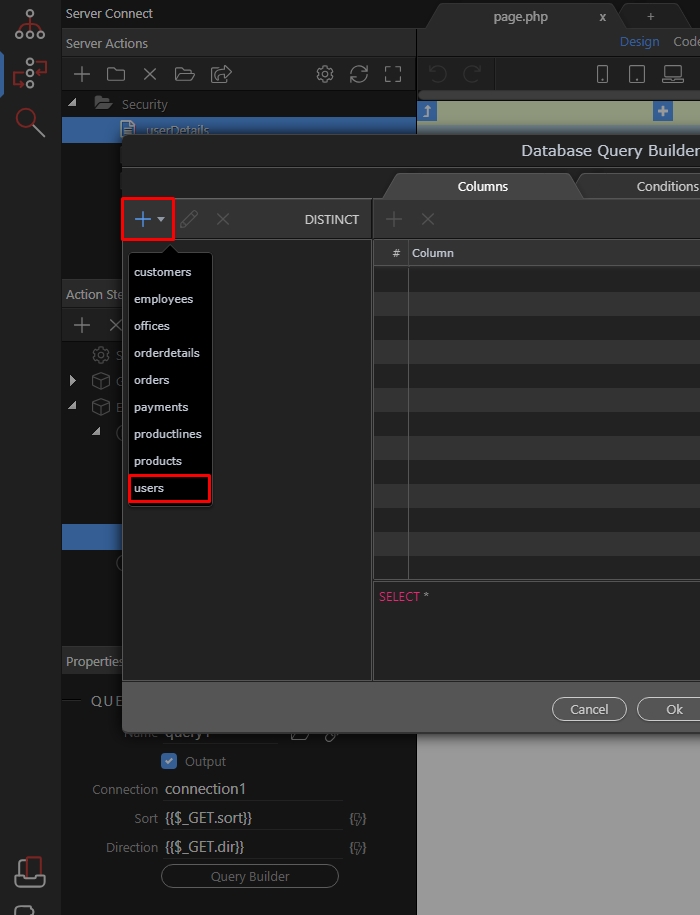
Step 17: Open the conditions tab:
Section titled “Step 17: Open the conditions tab:”
Step 17: Open the conditions tab:

Step 18: And select the user ID column:
Section titled “Step 18: And select the user ID column:”
Step 18: And select the user ID column:

Step 19: Select “equal” as the operator:
Section titled “Step 19: Select “equal” as the operator:”
Step 19: Select “equal” as the operator:

Step 20: And select the dynamic data picker button, to select a dynamic value:
Section titled “Step 20: And select the dynamic data picker button, to select a dynamic value:”
Step 20: And select the dynamic data picker button, to select a dynamic value:

Step 21: This dynamic value must be the “identity” parameter returned by the security provider:
Section titled “Step 21: This dynamic value must be the “identity” parameter returned by the security provider:”
Step 21: This dynamic value must be the “identity” parameter returned by the security provider:
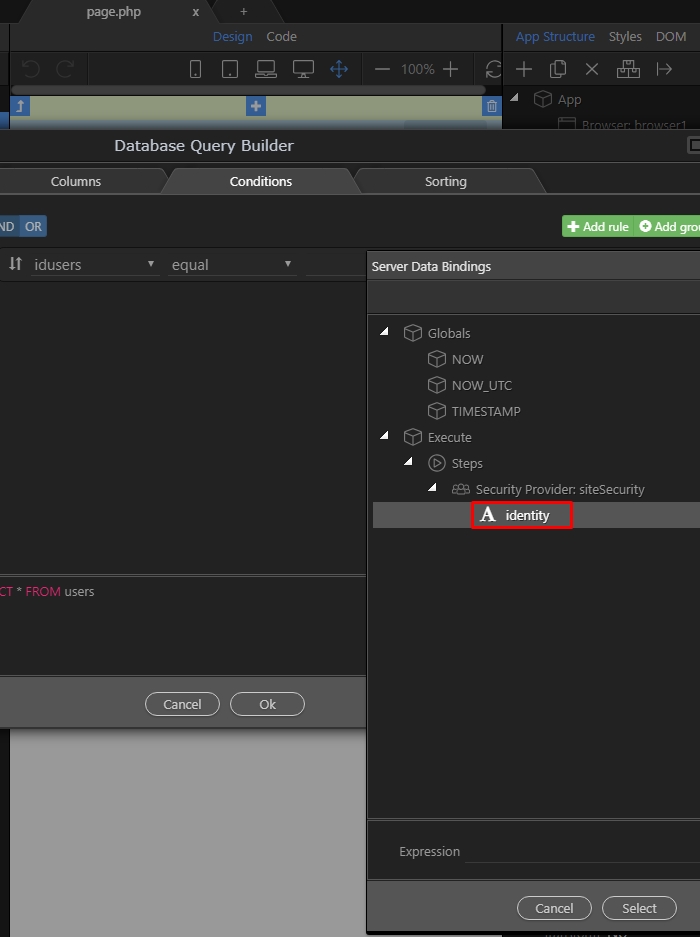
Step 22: Click select:
Section titled “Step 22: Click select:”
Step 22: Click select:
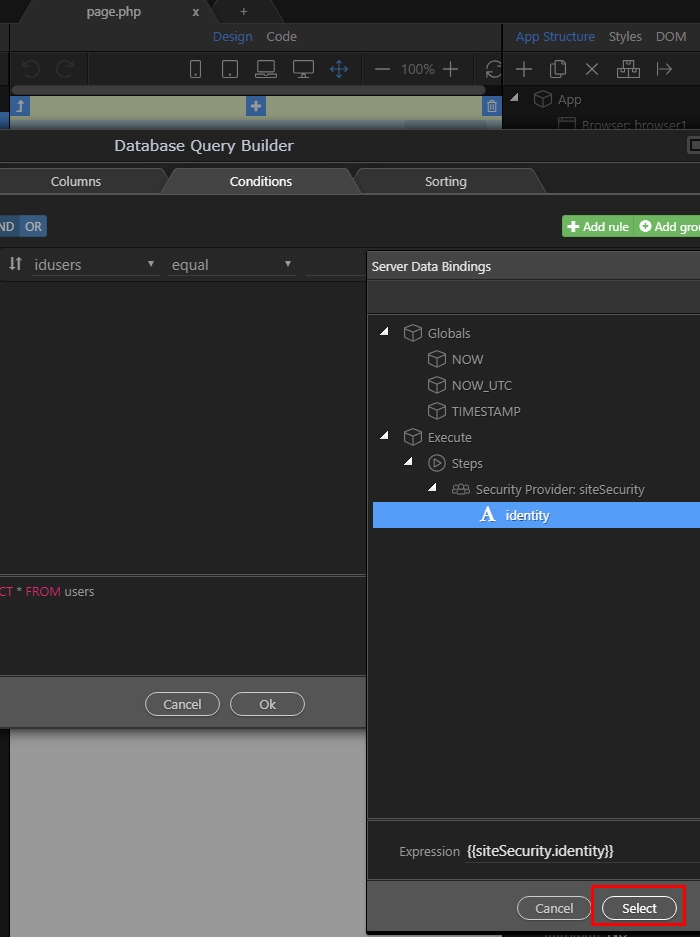
Step 23: And click “ok” to apply the query settings you have created:
Section titled “Step 23: And click “ok” to apply the query settings you have created:”
Step 23: And click “ok” to apply the query settings you have created:

Step 24: Save your server action:
Section titled “Step 24: Save your server action:”
Step 24: Save your server action:
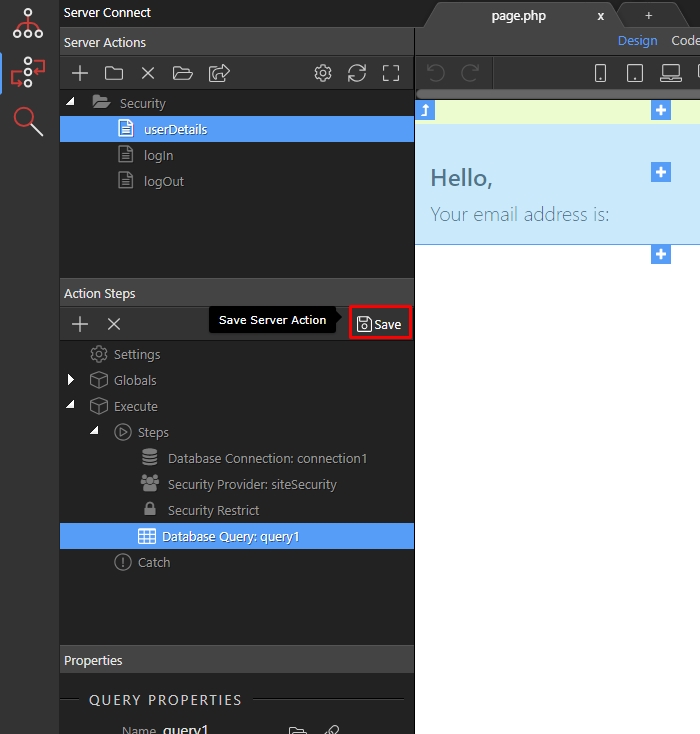
Step 25: Now on your page, in app connect panel add new component:
Section titled “Step 25: Now on your page, in app connect panel add new component:”
Step 25: Now on your page, in app connect panel add new component:
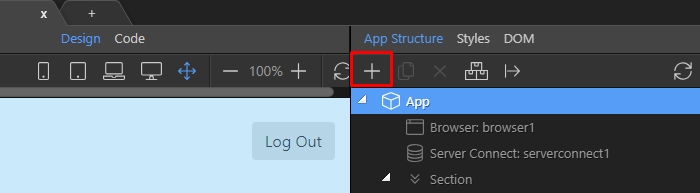
Step 26: Open Data:
Section titled “Step 26: Open Data:”
Step 26: Open Data:
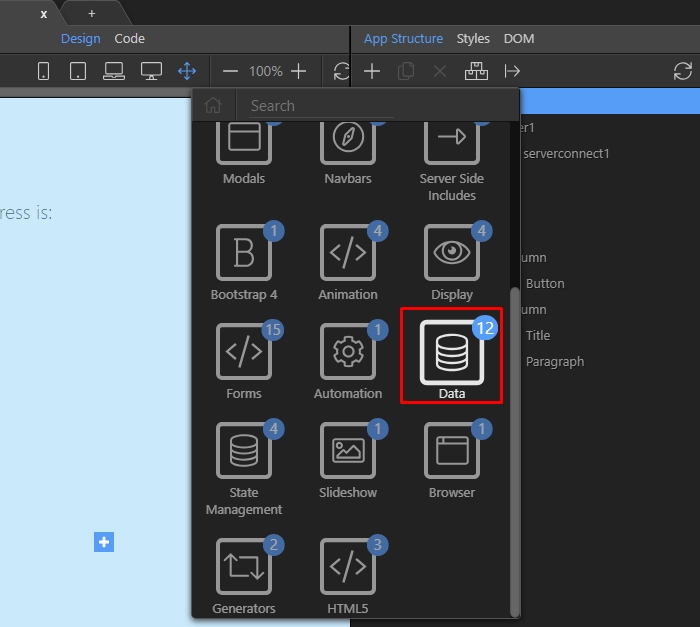
Step 27: And select Server Connect:
Section titled “Step 27: And select Server Connect:”
Step 27: And select Server Connect:
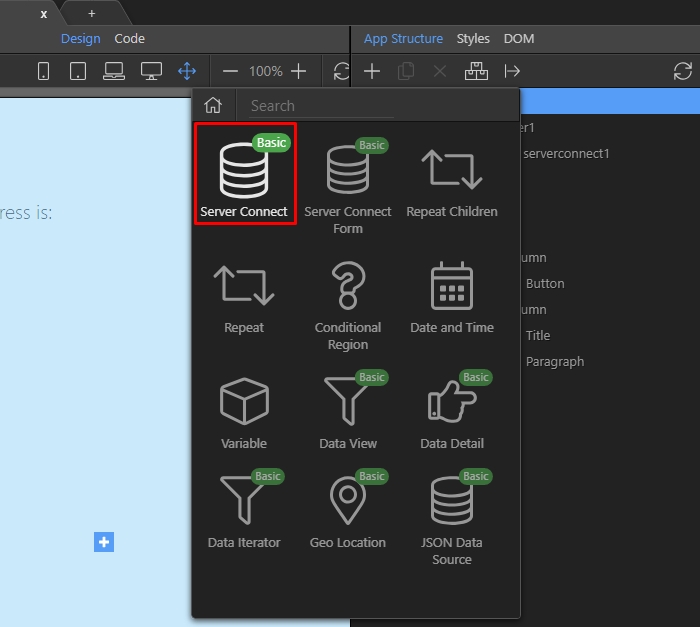
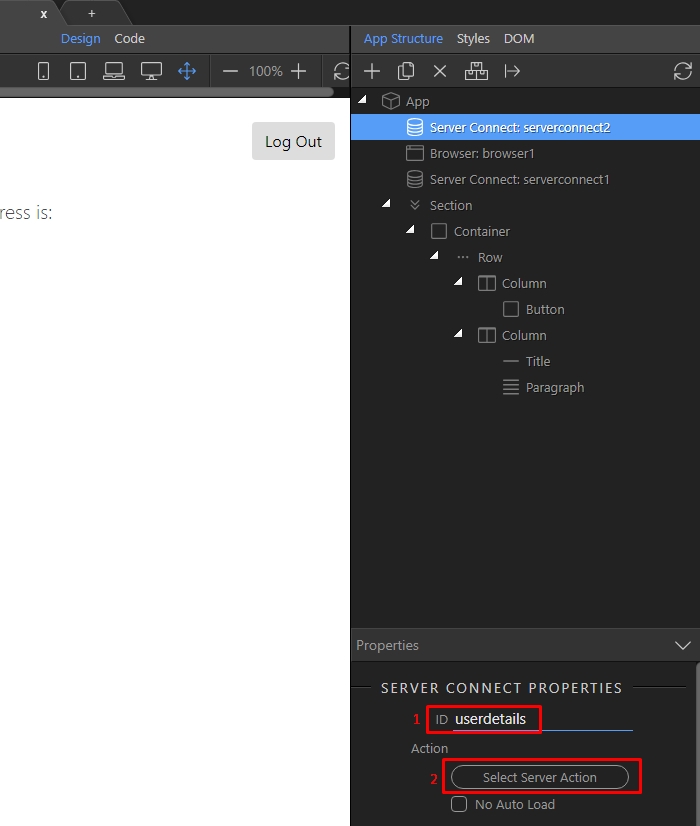
Step 28: We call it userdetails (1) and then click the server action button (2):
Section titled “Step 28: We call it userdetails (1) and then click the server action button (2):”
Step 28: We call it userdetails (1) and then click the server action button (2):
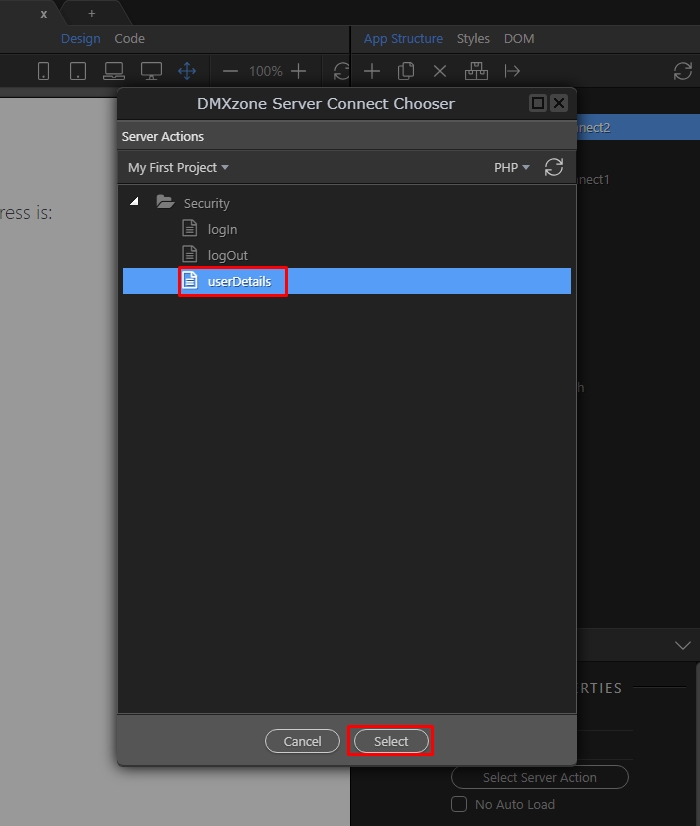
Step 29: Select the userDetails server action, and click Select:
Section titled “Step 29: Select the userDetails server action, and click Select:”
Step 29: Select the userDetails server action, and click Select:
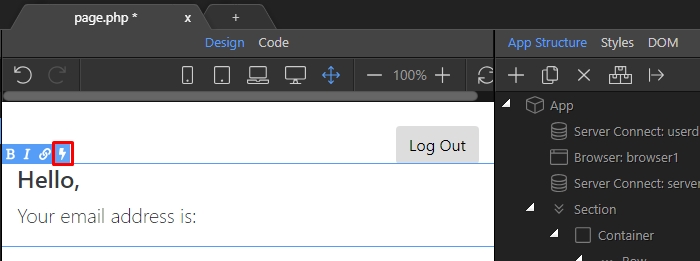
Step 30
Section titled “Step 30”
Step 30: Then, on the page - double click where you need to populate some of the users data and select the dynamic data picker:
Step 31: Under the userdetails server connect, select the data you want to bind and click the select button:
Section titled “Step 31: Under the userdetails server connect, select the data you want to bind and click the select button:”
Step 31: Under the userdetails server connect, select the data you want to bind and click the select button:
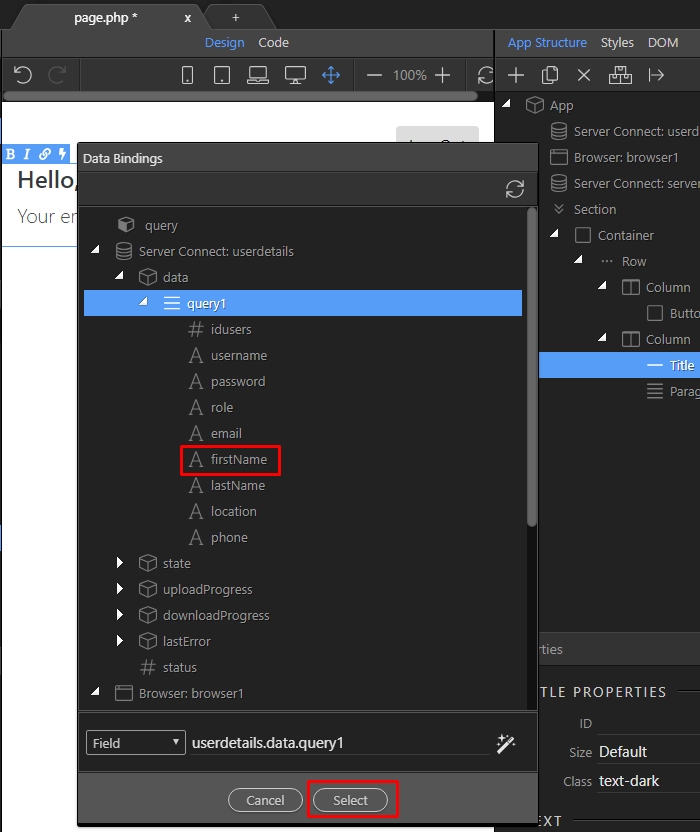
Step 32: Do the same for every binding you need to insert on the page:
Section titled “Step 32: Do the same for every binding you need to insert on the page:”
Step 32: Do the same for every binding you need to insert on the page:
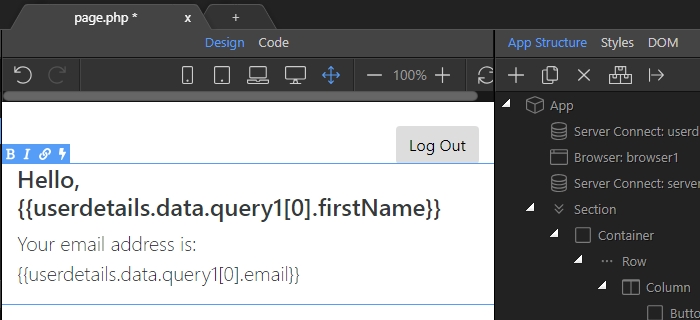
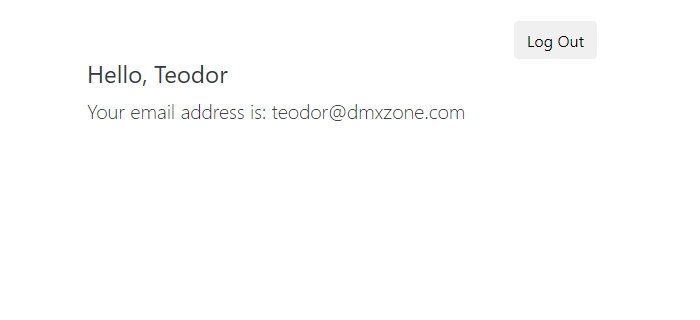
Step 33: Then, when the user logs in he will see his details:
Section titled “Step 33: Then, when the user logs in he will see his details:”
Step 33: Then, when the user logs in he will see his details: