Creating a Free Server with Oracle Cloud Always Free
With Oracle Cloud you can easily get absolutely free server that can pretty much run everything you need for a basic NodeJS web site with a Database.
It can be easily connected with Wappler for full docker deploy.
There are just a few specific steps that you need to take, so the communication between the server and Wappler is open and allowed.
So let's get started
Register at Oracle Cloud
You can create an account and register for the free tear in Oracle Cloud. You do need to add a valid credit card but you won't be charged anything but just a few cents to verify your credit card.
Start at: https://cloud.oracle.com/
Creating New Instance on Oracle Cloud
After sign in and registration confirmation, you can create a new instance (server). Do make sure you have a personal SSH key generated first if you don't have one, as explained in Create SSH Key
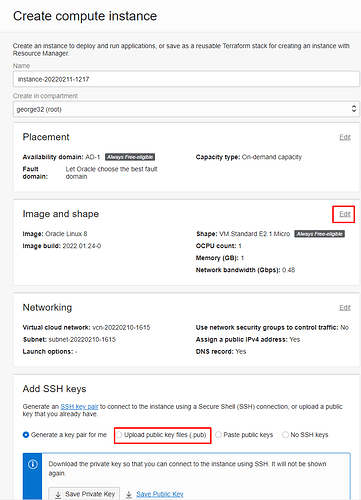
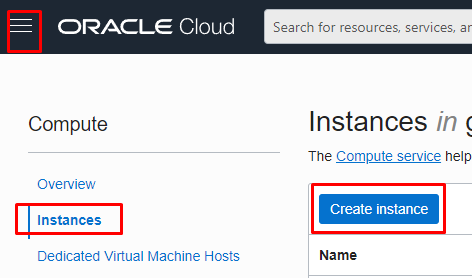
In the Oracle Cloud console, go from the menu to Instances and choose "Create instance"
We need to change that the instance runs Ubuntu and that your personal key is used:
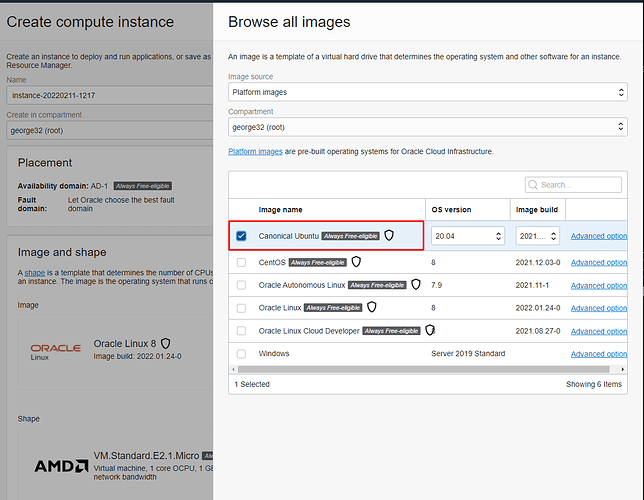
Click on the "edit" for Image and shape and choose Canonical Ubuntu:
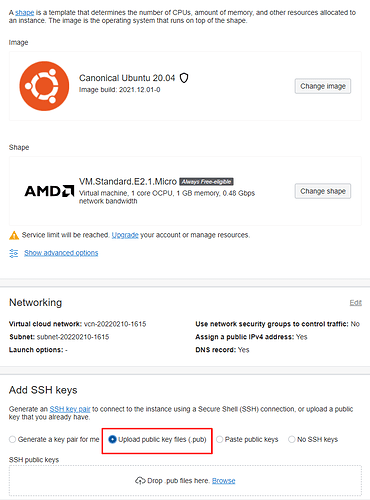
Then choose to upload you public key file:
and drop your ~/.ssh/id_rsa.pub file there that you have.
Then click on "Create" button below and your server will be running in a minute.
Opening ports
To make your server accessible from outside you need to open a few ports.
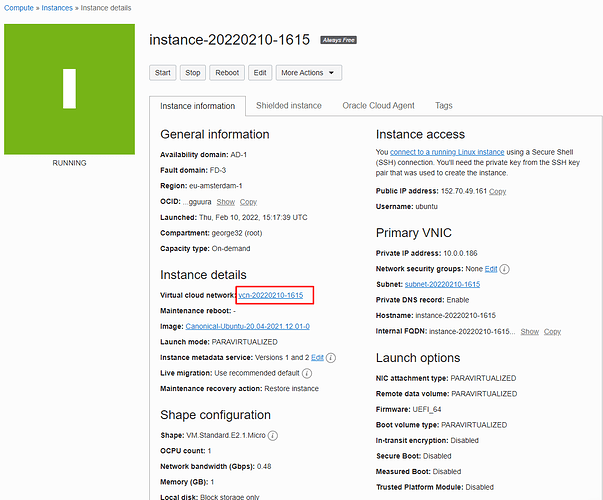
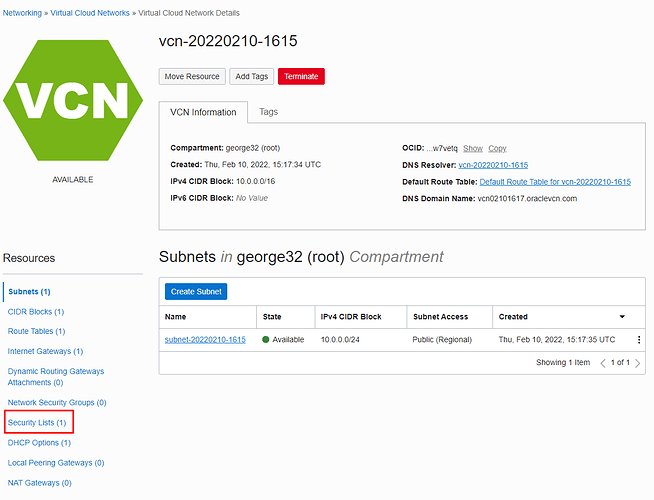
So when you see your server running, choose the "Virtual cloud network" from its properties:
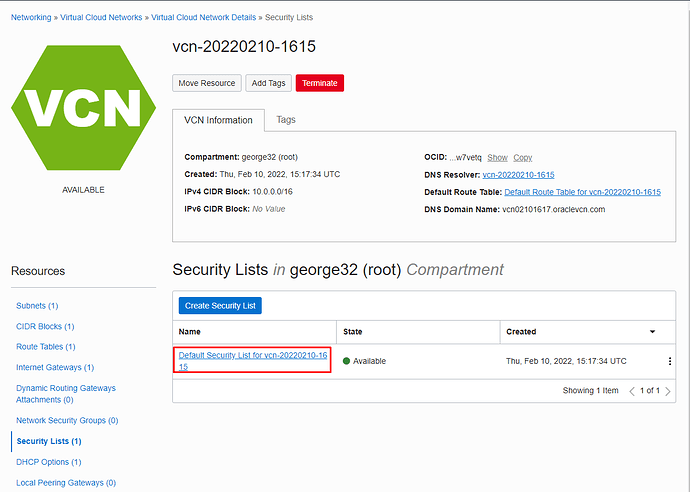
Click on it then click on the "Security Lists"
and then on the "Default Security List"
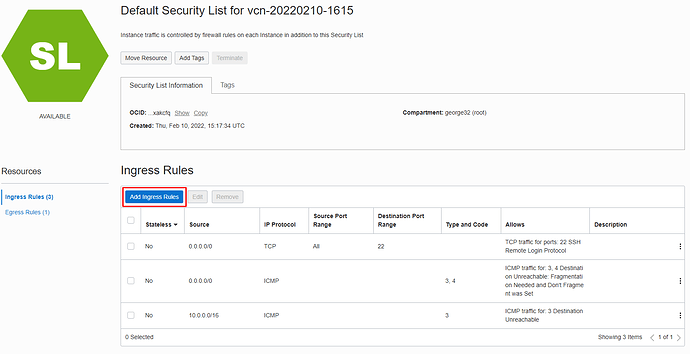
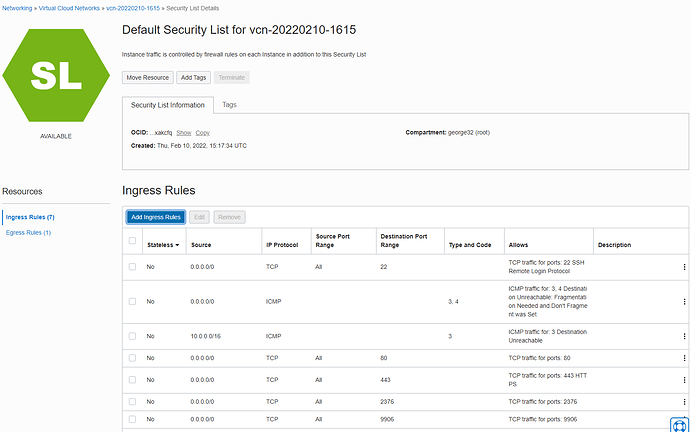
You will see that initially only port 22 (ssh) is allowed, we need to add a few more, so click on "Add Ingress Rules"
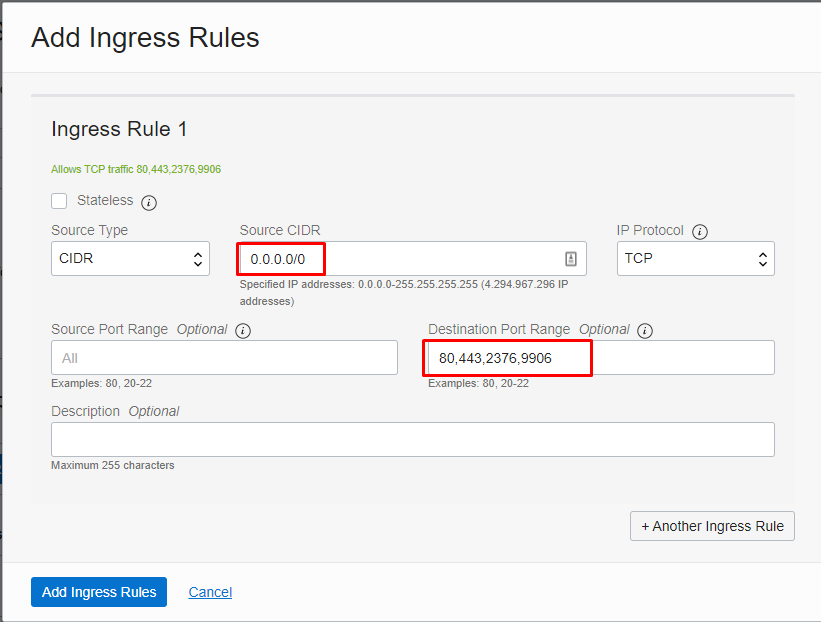
Select as Source CIDR just 0.0.0.0/0 meaning from everywhere
and add as ports 80,443,2376,9906 - 80 and 443 are for your web server, 2376 for docker communication and 9906 if you want to connect to a docker database on your server from Wappler:
Click on "Add Ingress Rules" and you should see them added:
So that is the Oracle part but unfortunately we have to add those ports, to the firewall in the server self as well.
Adding the ports to the Ubuntu firewall
You have to connect to the server with SSH to do this. So open a terminal and execute:
ssh ubuntu@xx.xx.xx.xx
Where xx.xx.xx.xx is the ip address of your instance.
You will be greated by Ubuntu message on succesful connection.
Let's list the current open ports, by executing:
sudo iptables -L INPUT --line-numbers
you will see something like this:
Chain INPUT (policy ACCEPT)
num  target     prot opt source               destination
1    ACCEPT     all  --  anywhere             anywhere             state RELATED,ESTABLISHED
2    ACCEPT     icmp --  anywhere             anywhere
3    ACCEPT     all  --  anywhere             anywhere
4    ACCEPT     udp  --  anywhere             anywhere             udp spt:ntp
5    ACCEPT     tcp  --  anywhere             anywhere             state NEW tcp dpt:ssh
6    REJECT     all  --  anywhere             anywhere             reject-with icmp-host-prohibited
So this means accept some connections like ssh and reject all others, as last rule six.
So we need to insert our own rules before the rule six, to do so execute:
sudo iptables -I INPUT 5 -p tcp --dport 80 -j ACCEPT
sudo iptables -I INPUT 6 -p tcp --dport 443 -j ACCEPT
sudo iptables -I INPUT 7 -p tcp --dport 2376 -j ACCEPT
sudo iptables -I INPUT 8 -p tcp --dport 9906 -j ACCEPT
Then when executing again:
sudo iptables -L INPUT --line-numbers
you should see:
Chain INPUT (policy ACCEPT)
num  target     prot opt source               destination
1    ACCEPT     all  --  anywhere             anywhere             state RELATED,ESTABLISHED
2    ACCEPT     icmp --  anywhere             anywhere
3    ACCEPT     all  --  anywhere             anywhere
4    ACCEPT     udp  --  anywhere             anywhere             udp spt:ntp
5    ACCEPT     tcp  --  anywhere             anywhere             tcp dpt:https
6    ACCEPT     tcp  --  anywhere             anywhere             tcp dpt:http
7    ACCEPT     tcp  --  anywhere             anywhere             tcp dpt:9906
8    ACCEPT     tcp  --  anywhere             anywhere             tcp dpt:2376
9    ACCEPT     tcp  --  anywhere             anywhere             state NEW tcp dpt:ssh
10   REJECT     all  --  anywhere             anywhere             reject-with icmp-host-prohibited
We do need to save those rules now and load them. So execute:
sudo netfilter-persistent save
sudo netfilter-persistent reload
So now you are done!
TIP: a handy tool to check if you opened the ports correctly is: https://portchecker.co/
Adding the server in Wappler
Now you are done, so we can go and add the serve in Wappler now.
Just follow the other guide:
And you are done and can fully deploy to Oracle Cloud for free!
